‘White on White’ Images
Today’s advanced camera meters are practically fool proof; but there are some circumstances where you will want to adjust your exposure for the best photo, including ‘white on white’ photographic opportunities (such as arctic hares on snow). Your camera meter is set to look at the world as a gray zone, with the standard exposure set at 18 percent gray. Most of the time, this average is correct. When the only color visible through your lens is white, however, your camera will read it as gray, which will cause an under-exposed photograph.
In order to compensate for the camera’s false metering, you should increase your exposure time by one to two stops (one stop for a photo of a bear against a white background, or two stops if you are just shooting a landscape of bright snow).

Polar bear cubs of the year nursing in the Churchill Wildlife Management Area. Eric rock photo.
When using a digital camera, if you use the screen to set up your shot, you may notice that the image will either be too bright or too dark. To correct this problem, find a spot close to your subject that has some contrast, such as a log in the snow. Point your camera at this spot, push the button half way, and then recompose your shot on the subject you want (and take the picture). If you play with this technique, you will see that by moving your camera slightly, you can significantly change the exposure of your photographs.

Arctic fox on the tundra. Brad Josephs photo.
Digital cameras with interchangeable lenses do not normally use the screen to compose the picture, but the same principles can be applied just after the shot is taken. Review your image and adjust your setting accordingly, or meter off of a spot with more contrast near your subject.
Photography Gear List
Below is a list of photography gear you might find useful on a trip to Churchill to photograph the polar bears and other arctic wildlife. Great photography results can be achieved by using a variety of equipment, though a basic SLR camera these days can do a great job as well. You will be able to take excellent photographs, whether you are using a simple point-and-shoot camera or SLR with interchangeable lenses.
– Lenses
Generally three lenses can provide an excellent range of photographic images from most wildlife destinations. Wide angle for landscapes, city-scapes and people. Telephoto-zoom for wildlife close up shots. A general 35-80 mm lens is good for most scenery and people shots.
The choice of lens is often determined by the type of photography in which you are most interested. Photo opportunities will often present themselves at a variety of distances and conditions, so it’s advisable to bring a variety of lenses if you have them available. In general, a good wide angle to normal zoom, as well as a telephoto zoom or fixed focal length lens, will cover the majority of situations you will encounter. A telephoto focal length of 300mm or more is useful for compressed landscapes and general wildlife shots; a 17–50mm is a great range for many landscape and people shots; and a medium telephoto of 70–200mm is a useful range for a wide variety of subject matter.
– Polarizer or Daylight Filter
A polarizer helps gain depth and deeper color in photos. The blue sky in photographs becomes much richer when a polarizer is used. Different grades of tone and color are available for all conditions of lighting.
– Tripod
A tripod may come in handy if you have a big lens, or wish to take low-light or long-exposure shots (such as northern lights shots). Tripods today are made of composite material eliminating much of the excess weight the old style ones used to have.
– Extra Lens Caps
Because lens caps often get lost, it’s a good idea to have extras on-hand. These can be bought at camera shops or ordered online. Canon and Nikon lens caps can be expensive, but cheaper generic brands are also available.
– Lens cleaners/lens cloths
We recommend a ‘lens pen,’ which has a brush on one end and a soft cleaning pad on the other. Always remember, no matter how soft your lens cloth is it must be clean of sand, grit and dust to eliminate scratching the glass. It’s a good idea to wash your cloth out every day and let it dry overnight.
– Extra memory cards
We recommend changing cards, or backing up to a computer or portable storage device, often to avoid losing your images if your camera is lost or stolen, or your memory card becomes damaged. Storage cards are inexpensive, so it’s best to shoot the highest quality images that your camera allows, rather than trying to save space.

Polar bears on the tundra in Churchill. Natural Habitat Adventures photo.
– Chargers
A couple of chargers for batteries are always good to have on hand. Batteries tend to fade more quickly in cold temperatures so keeping them charged is essential. When time is essential a steady rotation of fresh batteries is key.
– Extra batteries
Another way to ensure no interruption in photographic opportunities is to have an ample supply of chargeable batteries on hand. This will enable a constant rotation each day for optimal image capturing.
– Power strips
These can be very handy if you have multiple things to charge, especially in foreign countries where outlet converters may be limited. Keeping all of your charging materials in one place eliminates the possibility of forgetting the battery charger that was plugged into an obscure corner of your hotel room.
– Dry Bags, or Zip-Lock bags
Even though you may not be traveling to a water based destination To protect camera equipment from the elements.
Traveling With Your Equipment
Keeping your expensive camera gear safe from damage while you travel wherever you go should be your highest priority. A soft-sided backpack is a great way to carry and protect your photo equipment while traveling and will make it easy to keep your gear organized. Various backpack and case options are available.As you become more involved in the craft, hard – sided pelican cases might be a better option for protection of multiple lenses, cameras and other gear.
We strongly advise packing all camera gear in your carry-on luggage whenever possible. This way you will not be without it should your checked luggage be lost or delayed. Additionally, checked bags are more at risk for theft and damage as they are outside of your control.
General Tips for Photographers
We strongly suggest familiarizing yourself with any new camera equipment before departing on your adventure. It’s also a good idea to bring the user manual with you. If you are bringing an iPad or computer, an electronic version of your user manual may be available from your camera’s manufacturer.
If you plan to use an older camera, or have not used your camera for some time, it’s a good idea to have it inspected by a competent technician prior to your departure.
A variety of lens focal lengths is recommended for Churchill, as we will see bears and other wildlife up close and far away and also have great opportunities for wide-angle landscape shots. Although some people prefer the highest powered telephoto lens possible, most photographers agree that a 300 or 400mm lens is sufficient for most bear photography. Keep in mind, cameras with a cropped sensor (such as a Canon 50D or 7D) will have more zoom power built in; for example, 200mm is actually 320mm.
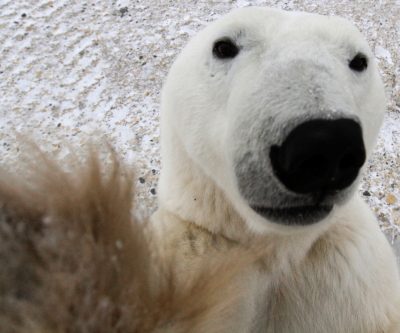
Up close and personal with a polar bear. Natural Habitat Adventures photo.
How close is close? It is possible that a bear may look right into the window of the Polar Rover. For this, a wide-angle lens comes in handy. Even if the bear is a short distance from the vehicle, a wide-angle lens allows you to take photographs with both the bear and your fellow travelers in the same frame. For photographing bears farther from the vehicle, a longer telephoto lens is helpful. Lenses at 200mm, 300mm and higher are suggested. As a general rule, up to 300mm can be satisfactorily hand-held.
To photograph northern lights you will need a tripod, cable-release (preferably with a lock) and a 28mm or 35mm lens.

Photographing northern lights from the Aurora pod. Alex De Vries – Magnifico photo.
A daylight filter is recommended to give a cool tint to your photos, or a polarized filter to protect against reflected glare. Churchill skies are often overcast in the fall, so you may use the daylight filter most often, but on the occasional sunny day on the tundra, a polarizer can offer a richer sky color.
Journeys to the tundra can be very bumpy, and we recommend a padded camera case to protect expensive photo equipment. Also, never place your camera bag on the floor of vehicles, as the vibrations can be damaging. Keep them on your lap or on the seat next to you.
Cold temperatures can sap battery power quickly or cause them to malfunction! Bring spare batteries (even if the ones in your camera or video recorder are new) so that you can have continuous power. Also, keep your extra batteries close to your body or add a hand/foot warmer to your camera bag when you are heading out into the cold.
Tripods will be very useful for long lenses or close-up photography, though the average leg size may fall through the grating on the deck of the Polar Rovers. Bring shoes or slashed tennis balls to increase the base of your tripod legs. You may also wish to insulate the legs with cushioned bicycle handlebar tape or pipe insulation.
A beanbag can help to steady longer lenses inside the Polar Rovers.
Wildlife activity on the tundra can range drastically from near to far. A second camera body, with a different speed exposure setting and lens, can be very helpful in widely varied circumstances. It also is a good back up in case your primary camera malfunctions.
A Note About Condensation
Condensation is a photographer’s nightmare. Just like a pair of eyeglasses fogging up when changing temperatures rapidly, a camera lens (and the inside of the camera) can fog up with condensation. Condensation is water forming on surfaces that are significantly colder or warmer than the air surrounding it. Technically, this means that if your camera goes into an area where the air is warm condensation will form if the camera is colder than the dew point. The opposite is also true. If your camera goes into a cold air area and the camera is warmer than the dew point then condensation can form.
The basic way to avoid condensation is to gradually bring your camera through these extreme temperature changes by sealing it inside a bag containing air the same temperature as the camera is acclimatized to. This way, any condensation forms on the bag instead of the camera as the air and camera gradually equalize to the new environment.
Photographing Northern Lights
Northern lights or aurora borealis are an incredible phenomenon of the Arctic. If you would like to photograph the lights, there are a few tips that can help you format a fantastic image. Firstly, you will need a camera that allows you to adjust aperture and shutter speed manually. Your camera should be set to the BULB setting (B) so that the shutter will remain open as long as you keep your finger on the button. For best results, use a cable release for exposures of 30 seconds or longer. You must also have a tripod to steady your shots.
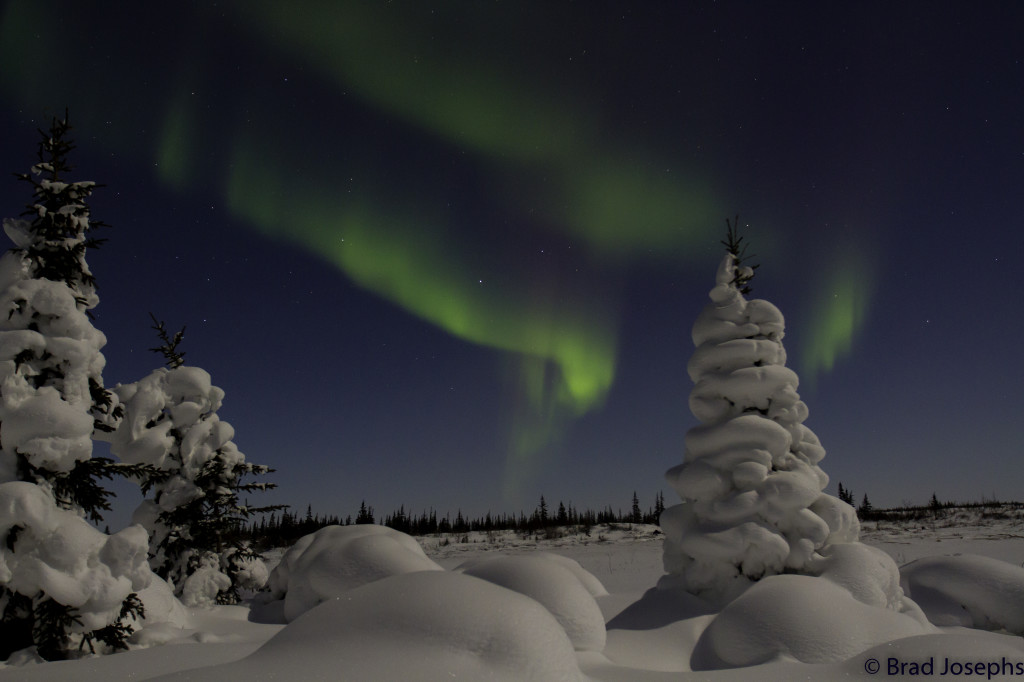
Snow encrusted trees near the Aurora Pod. Brad Josephs photo.
As for the actual exposure time, there is no set formula and you will have to do some guesswork. As a guideline, if your aperture is wide open, your shutter should stay open for about 20 seconds. However, to increase your chances of getting some good shots, we recommend that you take a large number of photos and experiment with varied exposure times.
Lens Selections
If possible, bring a spare camera body with you to act as a replacement in the event that your main camera body malfunctions. You can also use this extra body to mount a different lens, which will provide flexibility when composing a shot. Conditions can sometimes be such that it is difficult to change lenses, so having a spare body with a different lens attached provides a degree of flexibility that a single SLR camera can’t offer.
Cleaning The Sensor (SLR Cameras Only)
Extra care should be taken when changing lenses, as any particles that get into your camera can affect your images. A large rubber bulb blower is a handy tool to remove unwanted particles from the image sensor. You can also buy special cleaning brushes from your local camera store. It is extremely important not to scratch the image sensor when cleaning. If you are nervous about cleaning the sensor, it is probably best to take it to a camera shop and have a professional do it for you.
Storing Your Images
When you take a picture, the sensor saves the images to a file that is written to the storage media in your camera. Storage media comes in many different shapes and sizes, and most cameras can use only a specific type, so make sure that when you purchase a new camera you also have the correct storage media. The size of the media is important because it determines the number of images that can be stored on the card. The number of stored images is also affected by the size of the image files your camera is producing. You can change this setting in your camera.

Polar bears in the snow. Brad Josephs photo.
If you are interested in obtaining the highest image quality, then you should set your camera to record the largest possible image file. Additionally, if your camera is capable of storing images in RAW format, you could consider this option as well. Be aware that RAW image files require you to manually ‘develop’ the image before they can be printed or posted on the web, so you will need software installed on your computer to properly process these files. Unless you are very serious about image quality, the JPEG setting is usually more than adequate to produce excellent high-quality images. But, if you want the ultimate in digital flexibility, consider using the RAW format.
Once you have taken your images, and they are stored on your memory card, you should consider downloading them to your computer and/or portable data storage device. Once the files are safely transferred, you can then reset or format your memory cards and use them to record new images.
The best option when traveling is to bring several memory cards each day and store them in a safe carrying case. As each memory card fills up, place it in the case inside a ziplock bag and put a new one into the camera.
Power Considerations
It is important to make sure your electrical equipment can accommodate the electrical current used in the countries you travel to, and that you also have the proper outlet adapter to convert from your native style of plug. The electrical current used in the U.S. is 120V / 60Hz, but most camera chargers will accommodate worldwide electrical conditions. Information on compatibility is often found on the back of your electrical device and it is a good idea to verify these details before your adventure. If you are not sure of your devices’ compatibility with the electrical values in the areas visited during the adventure, we suggest bringing a converter to accommodate your equipment. Converters can be purchased at most electronics and/or travel stores.