Retired Canadian Mountie Sentenced to Prison

narwhal and tusk

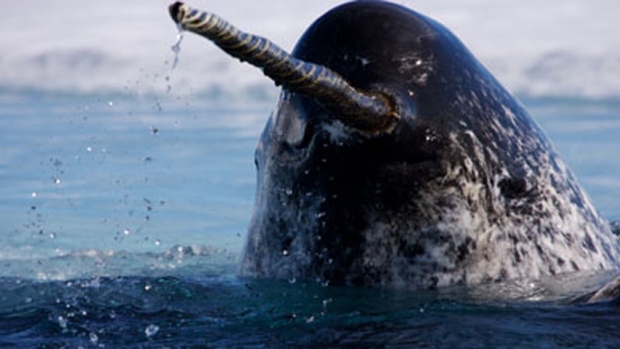
Narwhal tusks can grow more than 8 feet in length and demand high prices on the black market. Paul Nicklen/Getty Images photo.

Retired Canadian Mountie Gregory Logan, 60, of Saint John has been sentenced to five years and two months in a United States federal prison for smuggling nearly 300 Narwhal tusks with a value of $1.5 – $3 million US into Maine. The contraband tusks were hidden in false compartments in Logan’s vehicle according to U.S. prosecutors. Once in the United States, they were shipped from a post office box in Ellsworth, Maine, to wealthy buyers all across the country.

This story was first reported on in a March 2016 blog post on this site.

Narwhals, protected in the United States and Canada, grow ornate, spiral tusks that can grow longer than eight feet and are coveted for use in carvings, jewelry-making, and general display. Under the 1972 Marine Mammal Protection Act, it is illegal to transport any parts of a Narwhal across federal borders.

According to the indictment, Logan smuggled the narwhal tusks into the U.S. in 2000 while he was working as a Mountie. He retired from the police force in 2003.

Logan filled orders with his U. S. co-conspirators according to what they wanted in terms of quantity and size and then contacted northern Inuit hunters to supply the tusks.

“Unlawful wildlife trade like this undermines efforts by federal, state, and foreign governments to protect and restore populations of species like the narwhal, a majestic creature of the sea,” said acting Assistant Attorney General Jeffrey H. Wood of the Department of Justice’s Environment and Natural Resources Division.

U.S. District Court Judge John A. Woodcock sentenced Logan to money-laundering and conspiracy charges to which he pleaded guilty. Smuggling charges were dropped under a plea agreement. Logan has paid $350,000 in fines and served four months of home detention on a related wildlife – smuggling charge to which he plead guilty.

Co-conspirator and U.S. resident Andrew Zarauskas, of Union, N.J., was convicted and sentenced to 33 months.  A Tennessee man had charges dismissed. Logan was pinned as the leader and organizer of the scheme and therefore sentenced most harshly.

“He directed and organized the way in which the tusks were smuggled and shipped as well as the ways in which the proceeds would ultimately be laundered into Canada. In sum, (Logan) was the ‘hub’ without whom the ‘spokes’ could not have succeeded in their joint criminal enterprise,” they said in court documents.

The U.S. Department of Justice detailed how the scheme worked in a news release:

“Logan knew that his customers would re-sell the tusks for a profit and in an attempt to increase that resale price, Logan would occasionally provide fraudulent documentation claiming that the tusks had originally belonged to a private collector in Maine who had acquired them legally,” it said.

“In addition to shipping the tusks from Maine, Logan maintained a post office box in the Ellsworth shipping store as well as an account at a bank in Bangor. Logan instructed his customers to send payment in the form of cheques to the post office box, or wire money directly to his Maine bank account.

“Logan then transported the money to Canada by having the shipping store forward his mail to him in Canada, and by using an ATM card to withdraw money from his Maine bank account at Canadian ATM machines. At times, Logan also directed his customers to send funds directly to him in Canada.”

Churchill Polar Bear Adventure Photo Tips

Photo guru and Naturalist guide Court Whelan details how to photograph like a pro and get the most out of a Churchill polar bear adventure!


What’s in your Camera Bag? Churchill Polar Bear Adventure

It’s that time of year when Polar Bears are off the ice and migrating through the Western and Southwestern coasts of Canada’s Hudson Bay.  This means that folks are soon headed up to Churchill to photograph the iconic King of the Arctic.

Read on to make sure you have the right gear with you to get the photos you’ve always dreamed of.

Please note, photographic styles vary, as do conditions on the ground.  While this is meant to be a guide for choosing your camera gear, you should consider your own photographic interests first and foremost.

Wide Angle Zoom

This is certainly one of the most important lenses to consider bringing on an adventure “up north.”  While polar bear photos are no doubt the most anticipated, there are many other experiences that you’ll wish to photograph, including general landscape scenes, travel experiences, and the town of Churchill, too.  Something in the range of 18-55mm, 24-70mm, or 24-105mm for DSLRs or a 7-20mm, or 12-40mm on a mirrorless setup is ideal.

Zoom Telephoto

Having flexibility in your telephoto lens is immensely helpful while photographing polar bears, as they can be at a range of distances.  It’s not uncommon for polar bears to be within only a few yards, as they are curious creatures, all the way up to a hundred yards plus from you (after all, they are 100% wild animals!).  Generally speaking, your common zoom telephotos are top choices, like 70-300mm and 100-400mm on DSLRs and 40-150mm on mirrorless setups.

There are new lenses coming out that get you, even more, telephoto than this, all while maintaining a nice zoom range (Sigma’s 150-600mm comes to mind).  I haven’t personally tested these for sharpness and ease of use, but I can say that with each new lens and camera system I experiment with, I’m continually amazed at the higher and higher quality as new technologies consistently push the limit (in a good way!).

Maybe a super telephoto?

When I think super telephoto, I usually think about prime lenses 400mm or greater, but more commonly your 500mm and 600mm lenses.  If you’re not familiar, these are wonderful lenses and generally have incredible optics.  However, they are often quite pricey, too.  If you already own one of these and are considering bringing it on your polar bear expedition (examples would be a 400mm f/2.8, 500mm f/4 or 600mm f/4 on DSLR or 150mm f/2.8 on mirrorless), it’s indeed worth thinking about.

Whether or not you pack it is really going to depend on a) what else you plan on bringing for lenses and b) what style of photographer you are.  For instance, if you plan on bringing several smaller lenses (e.g., ultra wide, medium telephoto…10-22mm and 24-70mm) and a couple zoom telephotos like a 70-200mm and 100-400mm, a super telephoto might be a bit too much.  However, if you plan on just one wide angle like a 24-70mm, one medium telephoto like a 70-200mm, along with your 500mm f/4, I’d say go for it.  Again, 400mm should usually cover 90% of the shots, but you never know when it comes to wildlife…best to be prepared.

The risk here is that you can actually have too much telephoto — you definitely won’t need 500mm all the time.  Thus, it’s a balancing act of covering your focal ranges while also making sure you aren’t inundated by too much camera gear and too many options.  Versatility is key.

When thinking about a large telephoto, a second camera body is highly advisable, as you will not use it the majority of the time.

X-factor Lenses

I am always thinking about how to get a different shot.  If you go online and search for lion photos on safari, there is a lot of competition out there. Of course, first and foremost your photography is for you, and you shouldn’t worry too much about what other people are doing. But, by going to out-of-the-norm and meaningful locations like Churchill means that you’re part of a small group of people that have access to some of the most incredible sights and sounds.  Thus, you have the potential to really do something with your photos!

As a result, I am a big fan of bringing a couple “x-factor” lenses along with me, particularly my trusty ultra-wide angle and nifty-fifty lens.  My ultra-wide, if you’re not familiar, is capable of near-fish-eye effect, having a ridiculously wide angle of view.  Mine personally is a 17-40mm, used on a full frame camera.  For crop-frame cameras, a 10-22mm is excellent.  Other options for full frame set-ups include 14-24mm and 16-35mm lenses.  These enable you to get really unique shots that you’re not going to see elsewhere…period.

The other lens I generally bring is my nifty-fifty, which is a 50mm f/1.4 lens.  While it is fixed and has little versatility as a walking around lens, it can produce stunning results with shallow depth of field.  In fact, I often will force myself to use it, just because I can see things and capture things differently (there’s that word again!).  Snow on wooden windowsills?  All of the sudden a common sight is a compelling storytelling photo.

Accessories and other gear

You’re going to be in cold weather environments, so be sure to bring extra camera batteries and keep them warm by storing them in your pocket (the body heat prolongs their life).  And of course, bring plenty of memory for your camera.

A tripod is generally not necessary, and I personally feel they are just too much to deal with when exploring the tundra in all-terrain vehicles.  It’s far better to plan on hand holding your camera and being able to move from one part of the vehicle to the other to get the shot. Lugging a tripod along and having to set it up each and every time will result in missed shots.

However, if you are lucky enough to see the northern lights up in Churchill, a tripod is essential.  If the lights come out, you’ll be shooting in the dark and generally at exposures between 5” – 15”.  Thus, it’s worth bringing a small travel tripod with you, and keeping it in your room until there’s that lucky chance to use it one night.

Last but not least, folks with lots of lenses may wish to bring a second camera body.  Being able to put a wide angle on one body and a telephoto on the second will virtually double the number of shots you’ll get.  And, the more shots you take, the more show-stopping images you’ll have for a lifetime.

Hope these tips are helpful and don’t hesitate to recommend your own in the comments below.

All the best,
Court

Cameras for Photographing the Northern lights

PRO TIPS

What is the “right” kind of camera for photographing the northern lights?

If you plan on traveling to a place for optimal viewing of the Northern Lights and plan to photograph them (I’m quite partial to Churchill, Canada), you’ll need to think about your camera equipment, as not all cameras have the capabilities to photograph the aurora.

Your Camera’s Capabilities

While actually getting the photo can be a little complicated (and I’ve outlined proper techniques HERE), determining if your camera can photograph them isn’t difficult at all.  While having a good quality lens is helpful, that’s usually not the limiting factor.  Instead, it’s your camera’s ability to shoot at long exposures while at a high ISO.

As a photo guide for Northern Lights Photo Expeditions, I’ve unfortunately seen some guests come with cameras that could shoot at long exposures, up to 30 seconds, and they could also get to high ISOs, 1600, and even 3200.  However, the camera could not do both at the same time.  This is a deal breaker!

Be sure to do some test shots at home (and at night) when evaluating whether your camera’s cut out for the job.

Deciding on the Right Lens

If you do have a point and shoot, and it’s passed the test from the above section – you’re all set!  No need to think much further.  However, if you have a camera with interchangeable lenses (or you’re thinking about upgrading to one), this section is important for which lens is right for the job.

Generally speaking, you should prioritize the angle of the lens vs. the speed of the lens.  You’ll often hear people saying that you need a fast lens…that is, one with a very wide maximum aperture, like f/2.8 or even f/1.4.  While this is helpful in getting the best photos possible, you don’t want to favor those apertures if it means you have to go with a 50mm or 85mm lens.  These just aren’t wide enough to get the full sky, let alone neat things in the foreground to give the shot context (like an igloo or inukshuk or people).

Thus, if you’re faced with the decision between a “normal” wide angle lens, like an 18-55mm f/3.5-5.6 vs. a 50mm 1.4, you really ought to go with the 18-55mm.  You need to have the ability to get a lot of the scene in your photo.  A 50mm version of the same shot as above looks like this…

It just simple doesn’t have the same effect, does it?

So, if you have an assortment of lenses, I personally recommend you bring the widest lens you have as your #1 pick.

However, if you’re planning on purchasing a lens specifically for photographing the lights, here are a few recommendations.  Keep in mind that they can get pricey, because the technology inside them to “have your cake and eat it too” is pretty advanced…

My top picks: 24mm f/1.4; 16-35mm f/2.8; 14-24mm f/2.8; 14mm f/2.8; 17-40mm f/4; 18-55mm f/3.5-5.6; 24-70mm f/2.8; 24-105mm f/4

The “best” camera

To start, let me just say that virtually any DSLR or mirrorless camera body is great, and you’ll likely come home with stunning shots.  However, if you really want to know the best, and shoot with the best, you ought to think about investing in a full frame camera.  They are indeed an investment, but they are specialists at photographing in dim or dark conditions.  They have a larger sensor, which means you can get dramatically better shots in very suboptimal lighting conditions.

If you’re not sure you’re ready to invest in a fancy camera body, read no further, as these are usually well over a $1,000 commitment.  However, if you have a budget to get the best, I recommend getting a full frame camera.  If you’re interested in learning more about different camera bodies, including full frame cameras, read my article about full frame cameras HERE.

In Conclusion

There are many ways and many combinations of camera bodies, lenses, and advanced point and shoots that will work for capturing the northern lights.  If you are opting for an all-in-one system, like an advanced point and shoot camera, be sure to test it to make sure it can shoot at long exposures and high ISOs.  If you are picking out a lens, make sure it’s very wide angle then choose based on the fastest speed (aka, smallest f/number)…not the other way around.  If you’re aiming to upgrade your camera system, want the very best, and price is no issue – go for the splurge and get a full frame camera.

Two Exquisite Northern Lights Photos

noerthern lights above Athabasca Glacier

Northern Lights above the Athabasca Glacier in the Canadian Rockies. Paul Zizka photo.


Aurora Borealis in Banff National Park, Alberta

“Eruption” of aurora borealis in Banff National Park, Alberta. Paul Zizka photo.

These two images highlight the creativity and photography talent of Paul Zizka. His northern lights photos, especially, evoke a solitude and ethereal feeling unlike any other photographer’s work we have seen recently. His usage of foreground features accentuate the tantalizing glow of aurora borealis. These western Canada northern lights shots capture the allure of the wild and untamed Canadian Rockies! Enjoy!

Pin It on Pinterest